
The Ultimate Guide to Beginning Brazilian Jiu-Jitsu
Free eBook

The Path to Blue Belt

The BLUE BELT. Your first belt…Will you wear it?
The blue belt, and the requirements to achieve it can seem challenging and elusive. Becoming this is a gargantuan first step in your skill progression. It takes time, effort, skill & grit, but what exactly does it take to be a Blue Belt? What does it mean to embody the skills that represent and don this first important rank?
The Path
The following is a comprehensive pathway to help you reach your goals. To be awarded the rank of blue belt. Everything you need to know and be able to do. All of this material will be taught to you in classes over time.
The skills listed below will be evaluated during testing. Testing is to be conducted on certain days scheduled periodically throughout the calendar year. If you feel you are ready, you may request to be evaluated on the next testing day.
Good luck, and I look forward to tying this belt around your waist when the time is right.
The 12 Strategies of a Mantis Boxer

Welcome to my course on the 12 Strategies of a Mantis Boxer. These strategies have been passed down through the generations as the bedrock of the style that was born in Shandong province, China in the chaotic and dangerous 1800’s .
“What is a mantis boxer?”
If asked this question, the answer is simple. If you use the following strategies in your fighting to defeat opponents then you are a mantis boxer.
These strategies, along with how they are executed and interpreted are unique to each individual boxer and coach. Some boxers may swap out a strategy and replace it with another that is relevant to them and how they fight. Some have more strategies, and others have less.
Let’s Get Hooked!
We’ll start this course by going through each keyword which includes a video and written explanation of each. At the end I will present some strategies for using the keywords in practice. As with any technique of significant value in boxing, the concepts are simple, the execution is summed up with the following formula: Effort + Work = Success. The concepts and methods are simple, conjoining them together in real time combat is the art!

Hook (Gōu 勾)

Hook (Gōu 勾) - the weapon of the Praying Mantis. It seizes it's opponent with it's large arms and hooks, then pulls it's prey off balance and devours it on the ground. When observing the mantis against a larger foe, one can see the mantis pounce, take the back, use it’s legs to hold on, and continually gain control of it's opponent while it bites and gains better hook positions to attack, and keep it safe.
We don't have large mandibles to chew on our opponents, nor would I advocate biting your enemies unless absolutely necessary. What we do borrow from a mantis' tactics is: controlling, seizing, binding up...the hooks!
The Mantis Hook, hand shape (Xiàng 象) is a key indicator of the style. This seemingly innocuous shape is highly effective and ingenious in it’s design. Other martial arts styles also use hooks: White Crane, Muay Thai, Wrestling (Mongolian and Western), but the Mantis hook places emphasis on the curling of the fingers to strengthen the forearm and the holds.
When a Mantis Boxer latches onto an opponent, the hook has been trained to create a tight clinch. When practicing tào lù (forms/shadow boxing 套路) they emphasize folding the fingers into the hook hand, engaging the muscles in the forearm. Training with this focus, as well as other tools/drills, increases the hook strength in the arms of the Mantis Boxer, giving them more control over their opponent.
How to Hook
One of the most dangerous and often poorly executed phases of a fight is when one fighter attempts to grapple another fighter while that fighter is striking and or kicking them. I call it a zombie attack, as it looks like a zombie with stiff arms attempting to grab a victims neck from too far away.
As you can imagine or have experienced yourself, this can end badly. In the following videos we’ll show an offensive way of ‘earning’ the hooks and clinch using connect and stick to avoid getting punished on the way in, as well as a way to turn your blocks into connecting and sticking your way to the hooking positions you’ll want in order to tie up an aggressor.
Disclaimer: These techniques and methods are on the advanced end of the spectrum. The require proficiency in striking and blocking, as well as an intimate understanding of connect, stick, hook, clinch, hang prior to being able to incorporate them into your boxing.
Offensive Hooking
Defensive Hooking
Hook Takedowns
There are a variety of hook-style takedowns included in mantis boxing. The following is a list of these takedowns and videos depicting them in use.
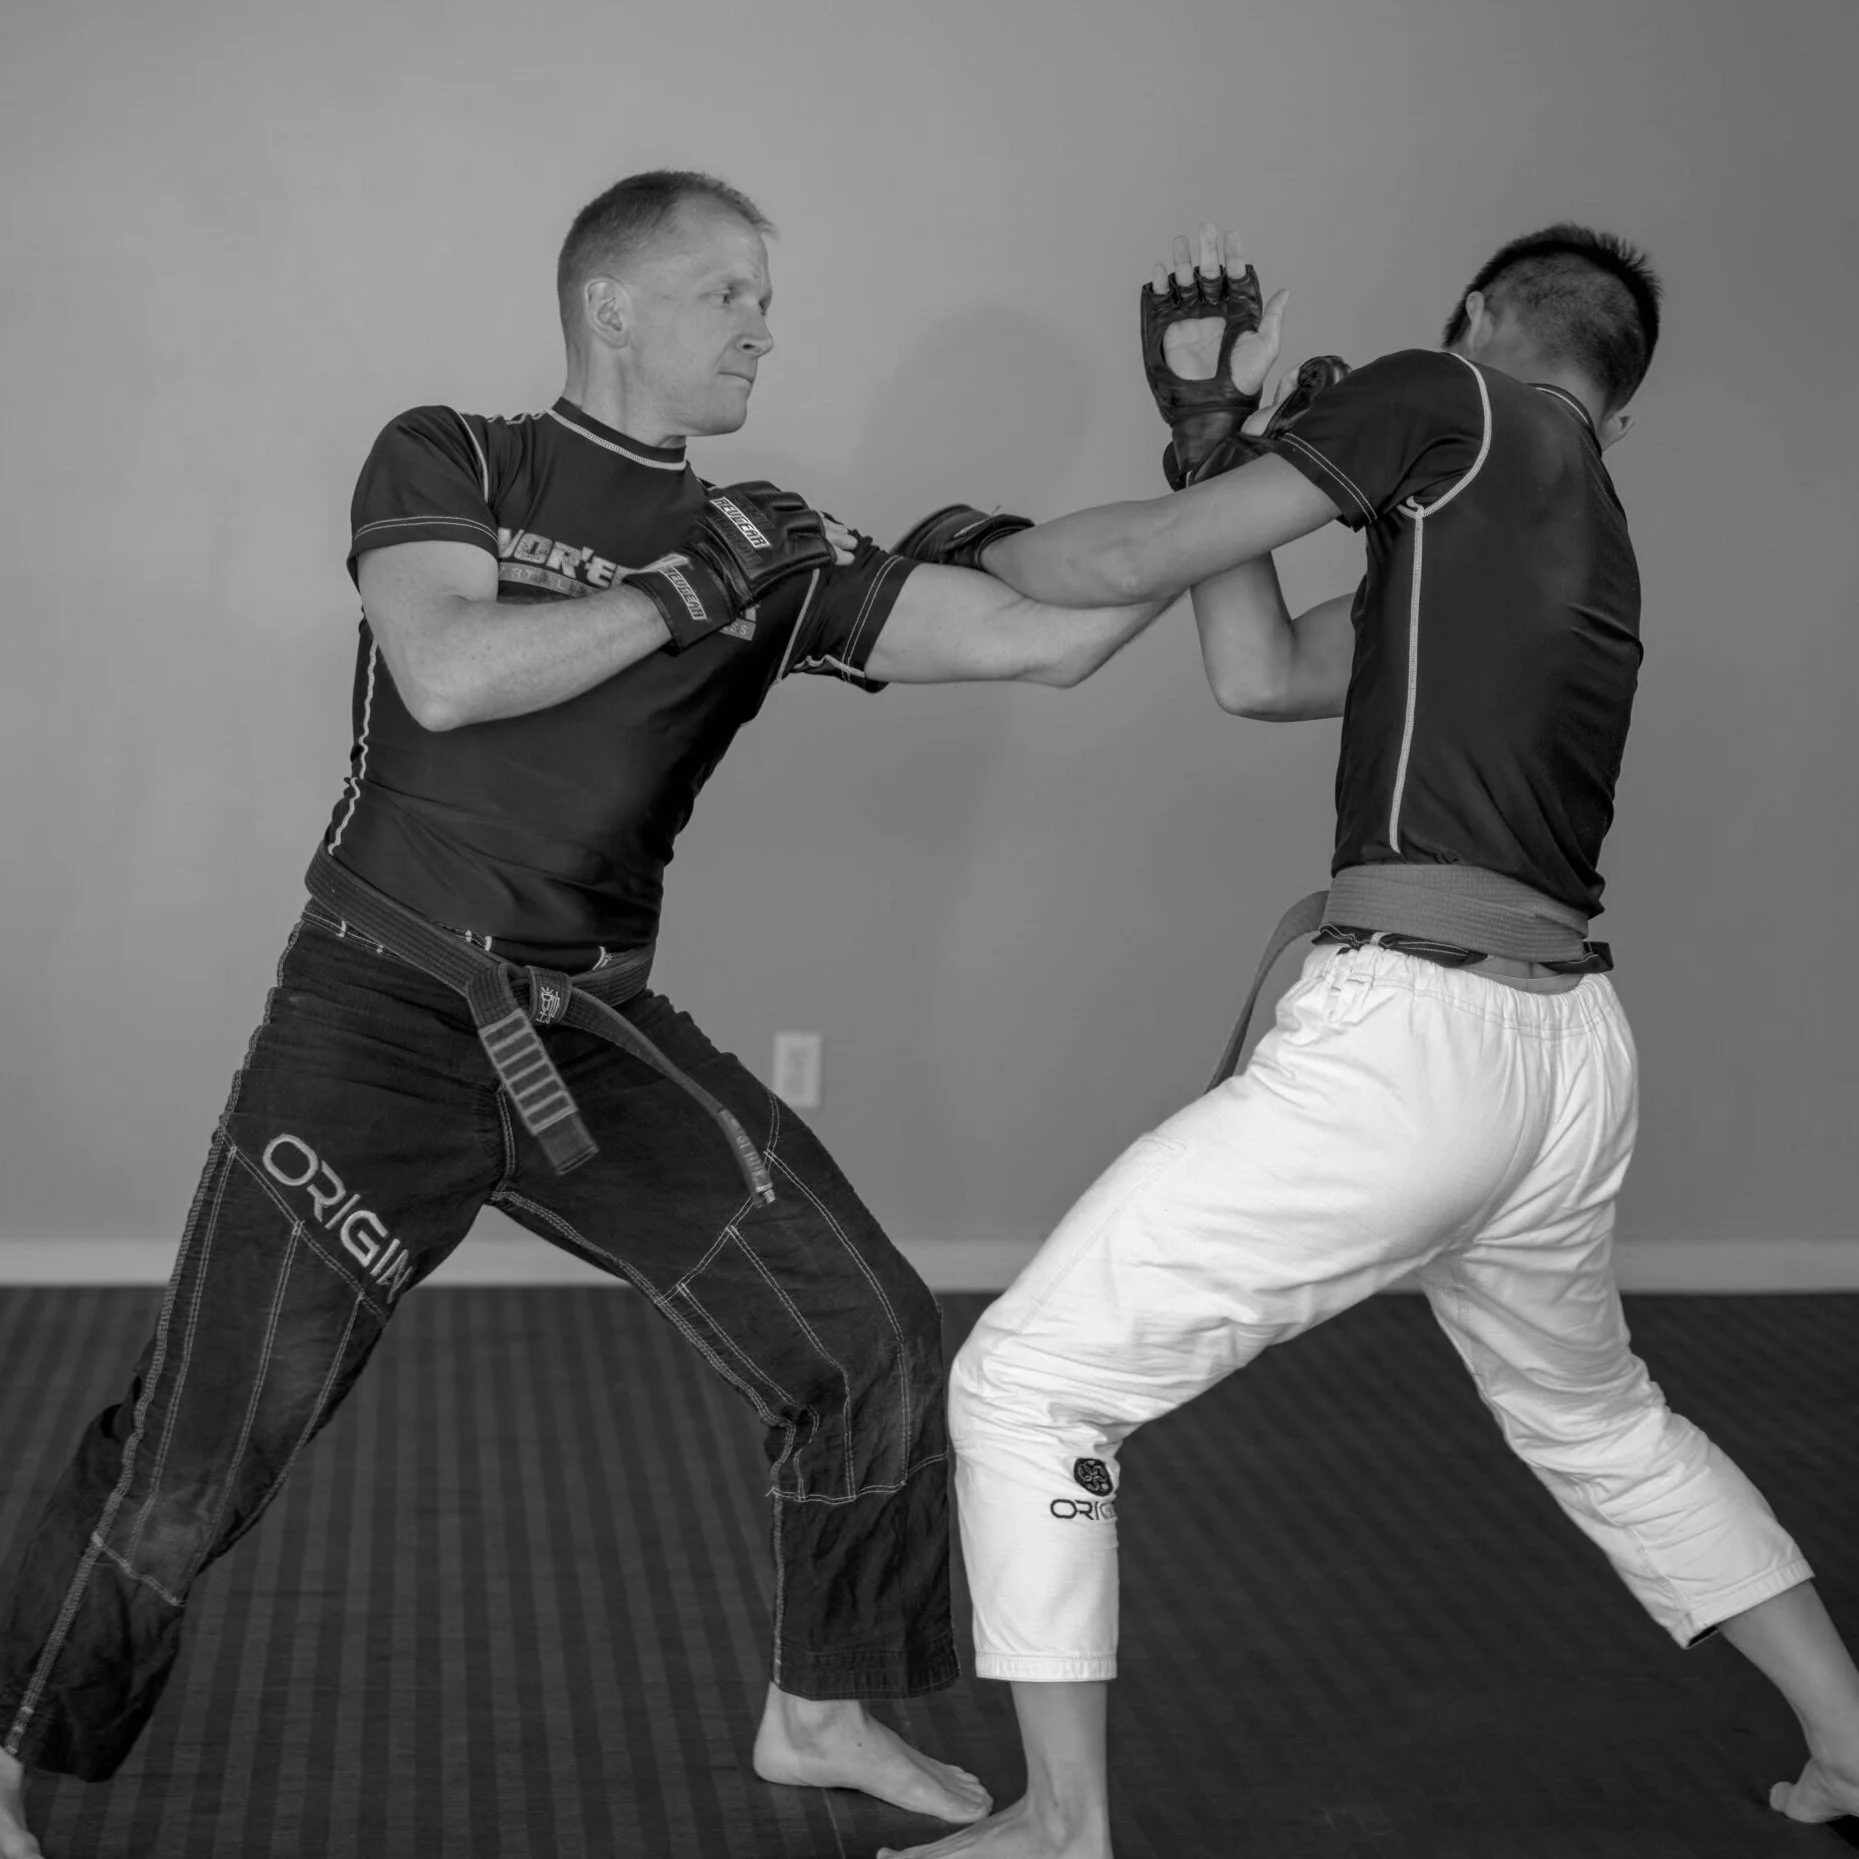
Clinching Hook (depicted above)
Twisting Hook
Piercing Hook
Hanging Hook
Spinning Hook
Blocking Hook
Rowing Hook
Lifting Hook
Seizing Hook
Leg Hook
Leg Hooks
Leg hooking is a major attack strategy for mantis boxers. The use of the legs as hooks resembling the arms of a praying mantis snatching its prey. The leg hooking heritage hearkens from Chinese, Mongolian, and Manchurian wrestling methods, and was highly prevalent in the common vernacular of Chinese boxing styles at the time of mantis boxing’s inception.
One of the primary reasons wrestlers in China and Mongolia can continue grappling well into their 60’s and 70’s is due to takedowns such as these, versus the common takedowns found in Greco-Roman wrestling such as single and double leg takedowns. While certainly effective, these require far more strength and explosiveness that is difficult to maintain as the body get worn and torn.
While not meant to be an exhaustive encyclopedia of leg hooking techniques, the next video can help lay the groundwork for applying leg hooks.
Clinch (Lǒu 摟)

Clinch (Lǒu 摟) is when we move from kicking and striking, to being tied up in the hooks, body clinch, rear clinch, underhook position, etc. This is where elbows, knees, takedowns take precedence over striking, but also where we are vying for control of our opponent's body and limbs.
The components of grip fighting, neck control, and gaining a positional advantage take precedence over using the fists. "Position before submission". Attaining superior position can lead to the takedown, throw, elbow, or knee, increasing the likelihood of ending the engagement. Managing range is crucial here, and we'll tackle more of that when we get to 'Adhere' (Tie 貼).
Why Clinch?
The clinch precedes the throw/takedown in many cases. Mantis Boxing is designed to strike and kick it’s way in, to affect a throw. Once engaged in the throwing attempt, an opponent may counter, out maneuver, over power, or strike. It is important to increase our grappling skills in order to handle this phase of the engagement.
4 Clinch Attacks to Start
The foll0wing video gives a few starting attacks to work from the clinch that are simpler in execution. This can help lay a foundation and answer the ‘what’s next?’ question after we get to the clinch.
Pluck (Cǎi 採)

Pluck (Cǎi 採) - a short sharp pull down, or powerful snap. We use Cǎi to feed our adversary into a disadvantaged position, or lead them into emptiness. Cǎi initiates from hook or the clinch, and is an integral component to setting up many takedowns, headlocks, chokes, and strikes found in Mantis Boxing.
Originating from the neck hook, double neck hook, wrist, and double arm hook, Cǎi is applied. It is used predominantly in conjunction with Wicked, Hang, Lean, and Clinch. Prominent moves in Mantis Boxing that use pluck are: Mantis Catches Cicada, and White Ape Invites Guest.
When grappling with our adversary, pluck can be initiated to bring the opponent’s weight forward, causing them to suddenly posture up, or resist backwards. At this moment, we can follow them and use applied force in the same direction they are already travelling, taking advantage of their movement and building momentum to affect a takedown or trip.
The same is true in reverse, if I pressure against my opponent, making them feel I am pushing them backwards, they will often resist and pressure back into me. This is a perfect opportunity to apply pluck, again using their energy concurrently with our sharp pull down.
Connect (Zhān 粘)

Connect (Zhān) - connecting with the opponent. The process of ‘trying’ to stick to them. This can be done by grabbing, hooking, finding a way to slow down the limb e.g., a retracting arm, a leg, or by taking advantage of a limb left behind.
Connect can also be accomplished through a strike, or a block. If we strike with a punch, and snap our arm back, we gain the advantage of returning to our guard position and defending counter-strikes, but we may miss out on the connect.
The idea with connect, is finding a way to stick to the opponent so we can close in (Enter (Jìn 進) ) and control the limbs; ultimately getting to a clinch position so we can manifest knees/elbows/trips/takedowns/throws/locks.
Connect translates as ‘to stick’. A good descriptive is if you took a piece of chewed up bubble gum and threw it at a wall, or stuck it to a desk. When it makes contact, that is Zhān. Closely linked to Nián, they appear to mean the same thing, but Nián is sticking rather than ‘to stick’. When you try to pull the gum off the wall afterwards, that’s Nián.
Stick (Nián 黏)

Stick (Nián) - is the act of sticking once we are engaged. Once connected, staying in contact i.e., clinging, sticking, following, allows you to ‘feel’ where your opponent is at all times, and control limbs. Instead of the floating limb being able to bite you.
Sticking/Clinging once we are grappling, is crucial to staying ahead of our opponent.
Connect/Cling is translated as Join/Stick in Tai Ji Quan (Supreme Ultimate Boxing). These principles use the same Chinese Character, and are one in the same in both arts.
Hang (Guà 掛)

Hang (Guà 掛) wears down our opponent, and forces more pressure on them while stabilizing our own position. This saps their strength, and decreases their mobility.
If we use the Mantis Hook on the neck while in the Clinch (Lǒu 摟), but we leave the hook loose, or stand up straight, we have no control over our opponent. By dropping the pelvis (the largest bone in the human body), we use our lowered center of gravity to 'hang' on our opponents neck.
In addition to sapping our opponents strength, we are able to do this with using less strength of our own. Try standing straight up and hooking your partner's neck. In order to pull them downward, or restrict their movement, we would need to use an incredible amount of strength. Now try the same thing and drop your hips while hanging on your partner. Notice the difference in strength usage, and intensity. This makes it much harder for them to move, while using less strength ourselves.
Once we are hanging on our opponent, now we can use Wicked (Diao 刁), Clinch (Lǒu 摟), and Pluck (Cǎi 採) to set up trips, takedowns, and/or strikes.
Wicked (Diāo 刁)

Wicked (Diāo 刁) is the use of deceptive tactics when in battle, and becomes part and parcel to the art we are doing. If we are a Boxer, we'll rely heavily on fakes and feints to expose weaknesses, or create weaknesses in our opponent.
If we are a Grappler, pretending to go for a choke in order to get someone to expose their arm so we can apply an Arm Bar, is another variation of this theme.
Musashi, the famed Samurai of the Book of Five Rings fame, used deception to defeat opponents, or fluster them. It is a common tool of strategy used in any form of warfare to win a battle, skirmish, or fight.
One of the many ways we use this keyword in Mantis Boxing, is a technique that Tàijí Quán calls - "leading the opponent into emptiness".
Using Pluck (Cǎi 採), and Push, Lean (Kao 靠) as well as fakes, and feints, or; setting up a grip, or a throw so we go for something other than what we appear to be doing. Using movements one direction to setup throw or trip in another.
These are all ways of using 'Wicked' deception to get something to work, rather than using strength to force a technique. There is always someone stronger, and even if we're the strongest on the planet, we all get sick, and have bad days. Relaxing and being sensitive to our opponents movements like we discussed with Connect (Zhān 粘) & Cling (Nián 黏), can allow us to read our opponent and trick them into submission.

Enter (Jìn 進)
Enter (Jìn 進) - or advance. This encapsulates a variety of ranges in a fight. Starting from the furthest range to the closest.
Long Range Enter - the first component of enter is crossing the range from outside where there is no fight, to entering within range to the fight itself. In military terms it is similar to a crossing the front line and entering battle. If either side crosses the line then warfare breaks out. We call this line critical distance.
Critical Distance is the invisible line separating us from our opponent’s longest weapon (rear leg attack). Outside of this line, there is no fight. Once we embark over this threshold, we enter a vulnerable stage of the skirmish. In order to successfully cross into enemy territory, we use what are known as ‘bridging tactics’.
Two such examples exist in Mantis Boxing - 3 Section Step, and Circle and Chop. The first, uses angling and position to attack the opponents centerline. This is a highly nuanced technique and requires a great deal of practice. When performed properly, it is extremely difficult to deter.
Circle and Chop, uses a heavy barrage of strikes and advancement with footwork, to overwhelm the opponent and run them down. This is another way to enter and the intent is to run down our opponent.You can learn more about Bridging Tactics in this article. Performing these tactics properly can vastly tip the scales in a fight.
Enter from Striking to Grappling - when we transition from striking to grappling, with the goal of establishing hooks, and a clinch, we must Enter with our feet as well, in order to close the distance. If we reach out to initiate hooks without moving forward, we violate our guard principle and over extend the arms.
This creates ample time, and space, for our opponent to land blows upon us and annihilate our efforts. It can also cause us to lean prematurely and create an opportunity for our opponent to throw us, or drag us down.
When we Enter from Strike we Connect, Stick. Then, and only then, do we attempt to hook if the opening is secure. If we lose position, or our opponent retreats, we can switch gears again and keep a solid advantage.Enter with Connect Stick Adhere - Entering the grappling phase of the battle when we connect and stick, we need to commit fully to engaging the single, or double underhooks and go forth completely to adhere. Failure to advance in this stage of the encounter, can lead to our own demise.
As we enter the flank position with a single underhook across the back, our opponent can capture our arm for a joint lock with Mantis Captures Prey. If we fail to enter with the double underhooks, and do not adhere to them, they can still rain punches, elbows and knees upon us with the available space left betwixt.Enter the Barricade - simply put, run them down. If our opponent doesn’t move, we continue to advance. How we Enter is what matters. We need to change gears on the way in. Kicks turn to Strikes. Strikes become Elbows and Knees. Connect and Cling become Hook and Clinch. These metamorphosis into Takedowns, Trips, Throws.
Enter upon Retreat - if our opponent retreats and creates space, rather than let them establish distance and regain their guard, or position; we enter/advance to follow. We enter with a kick, or strike until we can adhere once more.
Crush (Bēng 崩)

Crush (Bēng 崩) - to ‘collapse and fall into ruin’. Also known as 'crushing' in many Chinese Martial Arts usages. Bēng is used to attack the vital targets in the midsection of an opponent. Effective strike targets such as: the liver, stomach; ribs, and the real treasure - the solar plexus, or central palace in Tàijí Quán. All of these targets can disable an opponent with one hit. This is seen in countless boxing matches, UFC battles, Muay Thai fights, and Kickboxing bouts. What happens when you land a good strike on an opponent in one of these locations? They "collapse and fall into ruin".
Bēng, as a principle, can use a fist, a knee, a kick, all to accomplish the goal of - causing the opponent to - 'collapse, and fall into ruin'.
Aligning the Strike
If you examine the height of many of the stances found in Chinese Martial Arts forms, and in this case Bēng Bù, you'll see that the strike does not align with the opponent's face but rather with the solar plexus/lower rib region of a ‘standing’ opponent.
Dropping the stance aligns the punch to the effective strike targets (liver, stomach, solar plexus). Mantis Boxing uses the Horse-Riding Step (Mǎ Bù 吗步), Bow Step (Gōng Bù 弓步) to accomplish this alignment of the attack.
Punching to the face is certainly an effective attack, but it also hurts the striker if they aren't wrapping their hands, or wearing gloves. Styles of Karate have Makiwara boards, and Chinese Martial Arts has Iron Palm/Iron Fist to train the hands so as not to break/injure the bones while connecting with someone's hard skull.
Iron Fist training takes months/years to train. Conditioning the bones and skin is only accomplished through extreme dedication and commitment. It is faster to teach someone a technique to strike the vitals, meanwhile working on conditioning the hands for longer term strategies.
Keeping in mind: the human skull has evolved over millions of years to protect the brain inside of it. It's hard, and not meant to crumble at the first hint of danger. Quoting a bike-helmet study published in the Journal of Neurosurgery: Pediatrics, "235 kg (520 pounds) or 2,300 newtons of force would be needed to crush a human skull, almost twice as much force as human hands could possibly muster."
Plainly speaking, anyone who has punched another human in the skull with a bare hand can tell you - it hurts when you hit. Knowing this, it is easy to see why a striking principle like Bēng, is so prevalent in the martial arts.
One might be better served destroying an enemy in a soft target, rather than risk the injury of straight on face punching. This can be seen in other Mantis Boxing techniques aimed at the head region using alternate hand shapes: White Snake Spits Tongue, Spear Hand, Thrust Palm, Ear Claw.
Catastrophic Collapse
One of the 4 Pillars of Mantis Boxing is - throwing, tripping, and takedowns (Shuai 摔). With over 20 plus techniques in our arsenal from the four major grappling positions, our objective as a mantis boxer is to topple an adversary to the ground once we gain the hooks and clinch. This a significant execution of the Bēng strategy as a whole.
To be continued…
Strike (Dǎ 打)

Strike (Dǎ 打) - at it’s root, Mantis Boxing is a style of stand-up grappling. However, we need tools to get to the clinch and then throw; especially against an active and violent opponent. The style includes strikes and kicks to either knock out the opponent, or Enter (Jìn 進) to a grappling position in order to facilitate a throw/trip/takedown.
Strike is good keyword to remember when we are engaged in grappling against another high level grappler. At times, we can forget that a strike is available, succumbing to the common myopic infirmity of ‘Target Fixation’.
3 Methods of Strike
Strike to Damage
Softening the opponent with any one of, or combination of the strikes found in Mantis Boxing. These include fist strikes such as: Crushing Fist, Cannon Fist, Drilling Fist (uppercut), Scraping Fist, and Chopping Fist. Other options are Open-Hand Strikes which include: Thrust Palm, Eye Plunder, Ear Claw, Throat Claw, Spear Hand, Slant Chop, and Groin Slap.
Strike to Enter/Bridge/Connect
A basic bridging tactic for crossing Critical Distance is to strike on the way in. This occupies our opponent while we enter, rather than walking in and eating a punch. In order to successfully cross into enemy territory, we use ‘bridging tactics’.
A bridging tactic is a tool or method to occupy or distract our opponent in order to bridge the gap from out of range, to where we can land our attacks. There are a variety of methods in Mantis Boxing to achieve this, such a 3 section step, and double kick, but a rudimentary and base level bridging tactic is to strike upon entry.
Strike to Connect, to Stick, to Hook, then Clinch
Within striking range we decide to reach out and try to grapple our foe by getting our hooks on their neck/arms. This gives our opponent an opportunity to strike us, as they are no longer occupied.
By striking first, we engage our opponent’s limbs if/when they defend, and then transition from connect to stick. Upon sticking, we begin to hook, and then clinch. This provides a staged execution of reaching the clinch using strike, instead of being knocked out in our attempt.
The Strikes of Mantis Boxing
Open Hand Strikes
Palm strikes are used for attacking the head. This limits the damage done to the hand and allows for full power striking.
Thrust
Hook
Shovel
5 Fist Strikes
Fists are used for softer targets like the body, but a few are used for the head/neck region.
Chopping Fist
Straight Fist - Crushing/Cannon
Drilling Fist
Scraping Fist
Circle Fist
Finger Strikes
Finger strikes are used for precision striking only. These are vital targets that can quickly and efficiently dispatch an opponent.
White Snake Spits Tongue - Eyes
Piercing Palm - Throat
Ear Claw - Ear
Elbow Strikes
Elbow strikes are used inside the clinch. When fists and palms create too large of an opening in our defensive guard to implement them safely. Elbows are highly destructive.
Inside Elbow
Outside Elbow
Upper Elbow
Downward Elbow
Falling Elbow
Thrusting Elbow
Smashing Elbow
Knee Strikes
Knee strikes, as with elbows, are predominantly used inside the clinch. The exception being the skipping knee. Knees are powerful tools and create destructive damage upon impact.
Crushing Knee
Wicked Knee
Side Knee
Skipping Knee
For more instruction on the strikes of mantis boxing, you can access: The Strikes of Mantis Boxing course in the online member area. The course is also available as a stand-alone option in the storefront.
Adhere (Tiē 貼)

Adhere (Tiē 貼) - space management. Creating space when on the defense, and removing space from our opponent when on the offensive. If you want to reduce the level of control an enemy has on you - framing them, slipping the hooks, and increasing distance can help keep you from getting toppled.
On the inverse, when attacking the opponent, removing their space allows for greater control and openings for the takedown. Managing range becomes a crucial element in a fight. One of the most important.
If someone stretches back increasing space, and we’re still trying to keep our hooks in, we can get destroyed as we allowed openings and space for strikes. We have to change gears and switch back to striking, or even kicking if the range increases too much. If an opponent pushes off, or backs up, we follow them to stay adhered.
Position before submission
It’s important to recognize the saying - “position before submission”. We do not want to become so focused on striking, that we give up our position in the process. Being methodical, and taking attacks of opportunity, rather than trying to force the strike, allows for us to have a higher probability of staying dominant vs. defensive.
When adhering to our adversary, we should secure our position first before attempting to strike. Throwing a punch, elbow, knee, or applying a takedown, or throw without proper position first, will surely end in our own demise.
Lean (Kào 靠)

Lean (Kào 靠) - to lean against one’s opponent. Due to the heavy reliance upon grappling and clinchwork in Mantis Boxing, Kào is an important keyword when engaged close range with the enemy.
Postural Defense
Once we are entangled in the Clinch (Lǒu 摟), we lean in to protect our position, or risk being taken down, or pushed over. We use our foe as a support structure, leaning against them whilst engaged in grappling and clinchwork. This is synchronous with Adhere (Tiē 貼).
While we Adhere, we shore up our position by using Kào. If this becomes impossible, we should break range and secure a better position. Kào can shut down my opponent’s attempt at hip toss throws; dropping my CG making it difficult for him/her to get their hips (fulcrum) under my CG.
It also reduces chances for them using Crashing Tide; their posture would become compromised simply upon attempt. Another advantage provided by Kào, is buffering the double leg takedown. If we’re upright, our legs are within easy grasp, and shortens the time until their shoot. By leaning, I can sprawl easier and faster by dropping my CG and putting my weight down upon their shoulders.
Overall, if we can stay inside the clinch with a solid posture, and forward lean, we can use this pressure to time takedowns with applied force.
Applied Force
In addition to securing our position with solid posture, we can also use the shoulder to assist in our own throws. The shoulder is used heavily in a lean forward type motion to affect applied force. This assists in the execution of many takedowns such as Crashing Tide, Single and Double Leg Takedowns, Point at Star, Reaping Leg, Blue Heron Spreads Wings, and more.
Strategies
Here a few examples of using the keywords strategically to be more effective at combat:
Striking to Grappling
Wicked Enter to Bridge
Bridge to Strike
Strike to Connect & Stick
GRAPPLE
Stick and Connect to Hook
Hook to Clinch then Clinch to Hang
Enter to Adhere
Adhere leads to Lean
Lean leads to Crush
Knees
Hook to Pluck to Crush (knee strike)
Wicked Games
Pluck followed by Adhere & Lean to Hook (legs)
Lean followed by Pluck to Seal (choke)
Grapple to Strike
Hook, Clinch and Lean. Opponent breaks clinch. Return to Strike.
Crushing Step - Bēng Bù - 崩步

Bēng Bù (Crushing Step 崩步) is a prevalent tào lù (form 套路) of tángláng quán. It stands as one of the more popular fighting sets on record for the mantis boxing style, and is a commonality amongst many of the branches of mantis boxing after it split during the turn of the 19th and 20th century.
Although the name translates as 'Crushing Step', this is a bit of a misnomer. Bēng means - ‘to collapse and fall into ruin’. Rather than an actual crushing ‘step’, Bēng Bù is more specifically about the ‘steps to Bēng’. The set is a series of techniques leading to the ‘collapse and fall into ruin’ of our opponent. This can be represented at times with single moves in the form such as crazy ghost fist, but there are many interconnected sequences of techniques as well.
A series of counters to counters, ultimately leading to the enemies collapse. Think about Rule of Three from our 12 boxer principles. While execution and power generation of a bēng dǎ (crushing strike 崩打) is riddled throughout the set, the overarching theme is causing the collapse of our foe in a myriad of ways.
The character Bù (step 步), is defined as a step-by-step process. Or, in this case, using the step (footwork) to generate an ultimate end goal. Bēng Bù in its entirety, contains a myriad of attacks and positions that include - throws, grapples, plucks, kicks, elbow strikes, and more. Bēng however, is the foundation of this tào lù (form 套路).
The ‘engarde’ position known as ‘mantis catches cicada’ shows up in bēng bù right at the beginning. In bēng bù, as well as in other mantis sets, it is branded with the mantis hooks instead of the signature open palms found in other northern boxing sets such as plum boxing (meihuaquan).
At the end of the first road of bēng bù, there is a move often referred to as a ‘tiger tail kick’. There are versions with one instance of this as you start the second road, and others that end the first road with this move, and then repeat it in the opposite direction before heading into road two of the form.
Plum Flower Maiden Dancing from Pole to Pole. Circa 1880. Source: Wikimedia (though I believe that Stanley Henning was the first person to publish this image in his essay for Green and Svinth.)
Thanks to an article done by Ben Judkins on his Kung Fu Tea blog, I found a drawing of this exact same move. The article - “Research Notes: “Background of Meihuaquan’s Development During Ming and Qing Dynasties” By Zhang Guodong and Li Yun” discusses the influence meihuaquan had on the area of Shandong during the late 1800’s. This same ‘tiger tail kick’ move, as seen in the drawing from 1880, is inside the meihuaquan forms.
This plum boxing influence on such a staple form as bēng bù, draws into question any uniqueness of the techniques within, and points to a larger common vernacular of boxing methods found amongst styles in northern China during this time period.
As with many other tanglangquan forms, it is an exciting set to delve into with many great combinations inside.
Crushing Step Lexicon
Road 1
Crazy Ghost Fist
Mantis Catches Cicada
Thrust Palm Closing Attack
Knee Hook Lapel Punch
Leg Hook Lapel Punch
Falling Elbow/Reaping Leg
Rowing Hook
Road 2
Tiger Tail Kick
Double Sealing Hands
Chop with Fist
Deflect Parry Punch
Rowing Hook
Thrust Palm Closing Attack
Knee Hook with Lapel Punch
Step Up to Double Seal
Waist Chop
Wicked Knee
Beatdown Chop
Rising Elbow to Double Seal w/ Wrist Bind
Road 3
Seize Leg
Seize Leg
Closing Door Kick w/ Eye Plunder
Piercing Hook
Point At Star
Change Moon
Lifting Hook with Leg Hook
Catch Kick & Leg Hook
Seize Leg
Road 4
Seize Leg
Seize Leg
Waist Chop
Circle Punch
Rowing Hook
Lapel Punch w/ Trip
Closing
Crushing Step Applications
Road 1
01 - Crazy Ghost Fist
04 - Knee Hook Lapel Punch
06 - Falling Elbow
03 - Thrust Palm Closing Attack
05 - Leg Hook Lapel Punch
07 - Rowing Hook
Crushing Step Applications
Road 2
01 - Tiger Tail Kick
03 - Chop with Fist
05 - Rowing Hook with 7 Star
07 - Knee Hook Lapel Punch
09 - Waist Chop
11 - Beatdown Chop
02 - Double Sealing Hands
04 - Deflect Parry Punch
06 - Thrust Palm Closing Attack
08 - Double Sealing Hands
10 - Wicked Knee
Timestamp - 00:49
12 - Sticky Elbow
Warm-Ups, Strength & Conditioning

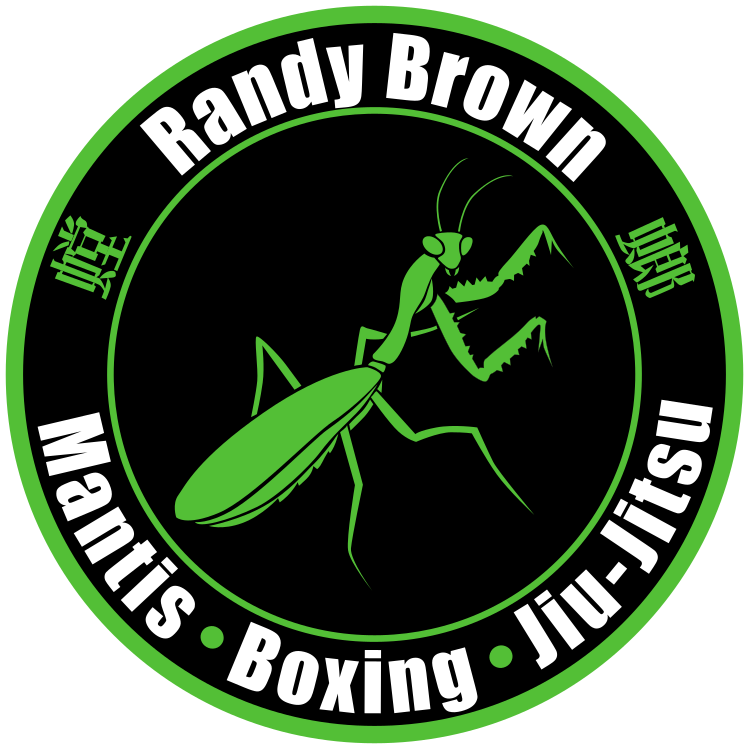
Staff Fighting
The staff, the grandfather of all weapons. There is nothing simpler than picking up a stick to hit someone with. This is the first of many weapons I was trained on over the years, and perhaps the one nearest to my heart. Simple, deadly, and versatile. The range of skill travels the spectrum so a novice can use this to maximum effectiveness, and a skilled weapons handler can wreak havoc on a battlefield.
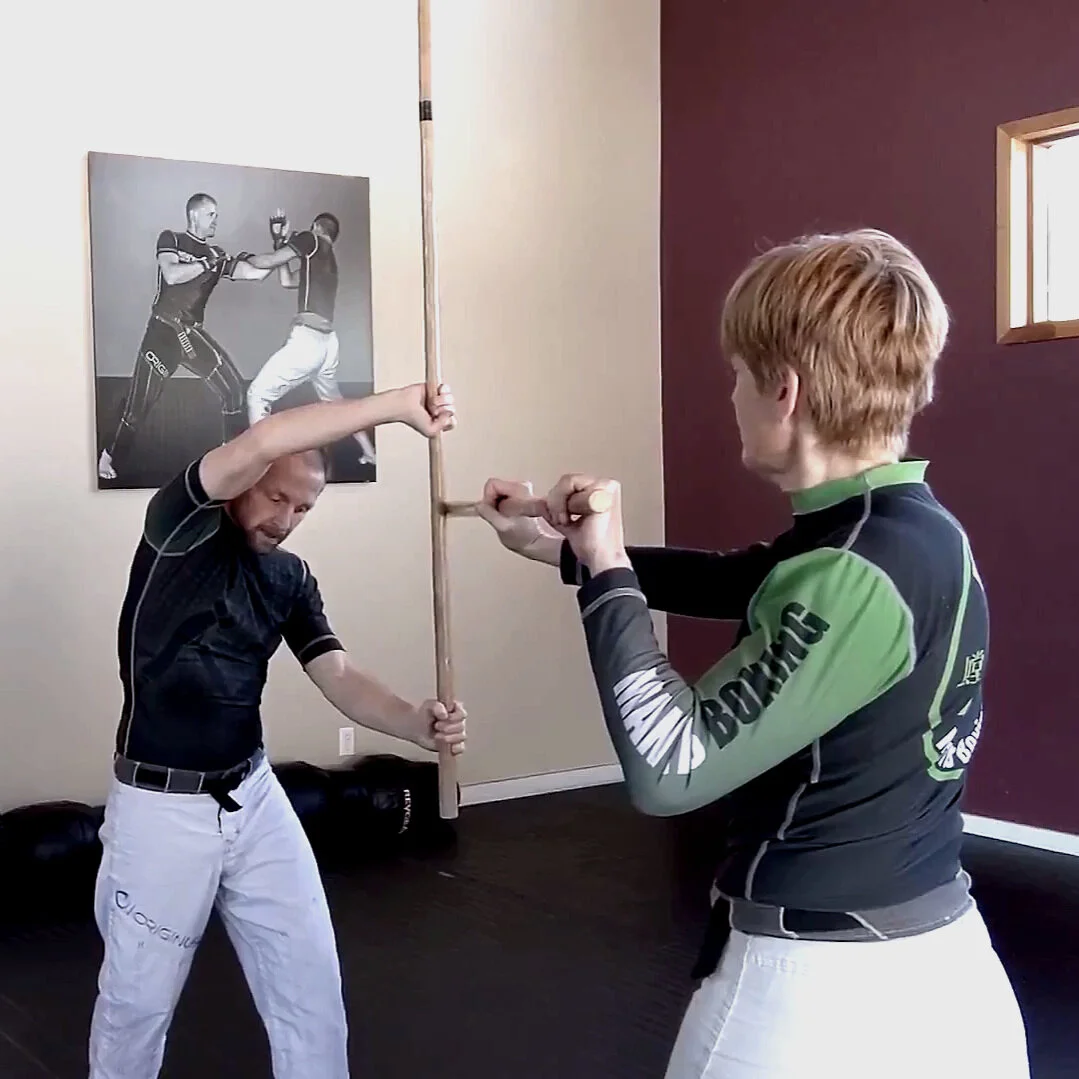
Self-Defense (Unarmed)
Basic self-defense, something every human being should know, and has a right to know to protect themselves, or their family. Self-defense training is comprised of stream-lined, no-nonsense methods to disable, disarm, or destroy attackers and escape precarious life-threatening situations. The methods are simple, practical, and do not require someone to be strong, or athletic in order to pull off. This course will focus on these methods and how to train them so they become second nature.
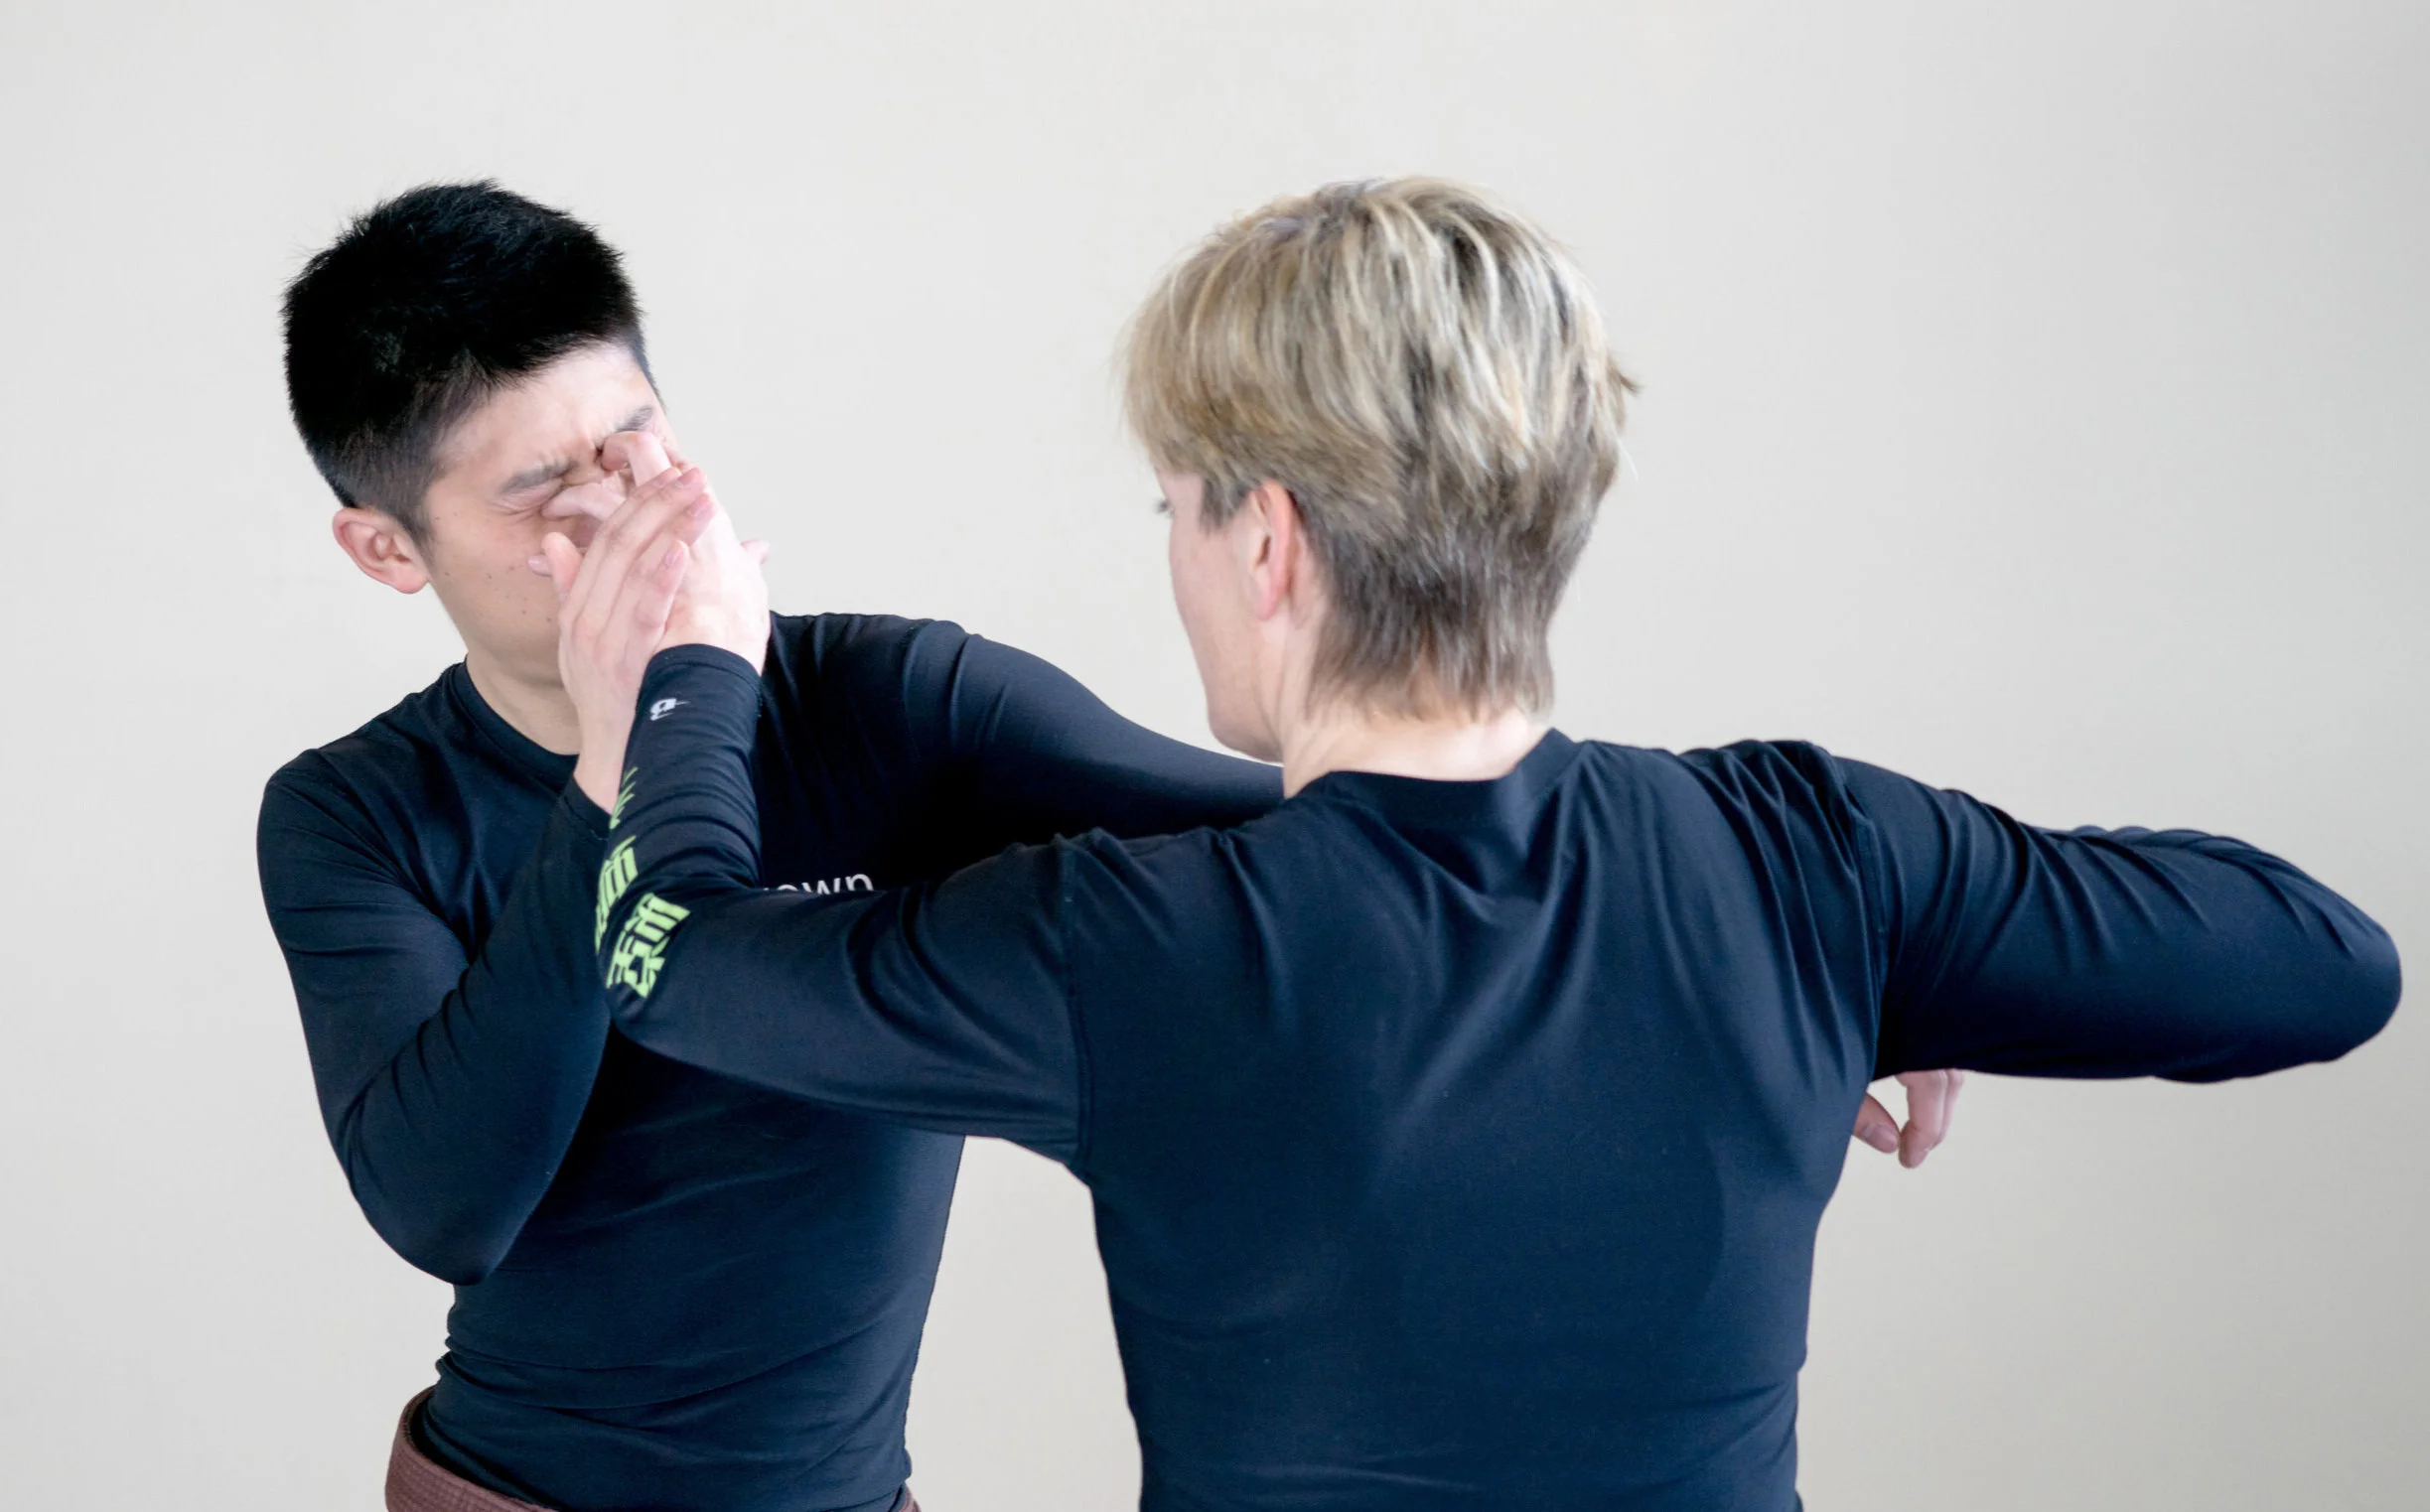
Gun Disarms
Taming the Lion - BJJ Course
Choke Submissions for the Ground
The primary attack methods for ground fighting outside of striking are submissions using chokes and locks. While joint locks are fast and effective, they can often be countered or resisted by bigger and stronger opponents.
Chokes on the other hand, are powerful tools to defeat an opponent of any size. In this course I’ll cover how to train the variety of chokes available to us either with a jacket, or without.

Understanding Chokes
Note: Solo Training Drills
A grappling dummy is highly recommended if you do not have a training partner to work with. You can also use a large pillow with a jacket wrapped around it.
THE CHOKES
Triangle Choke
RNC - Rear Naked Choke
Cross Collar Choke
Ezekiel Choke
Submission Training - Mission 1
Chokes
Perform 3 Sets of 10:
Triangle Choke
Rear Naked Choke
Ezekiel Choke
Cross Collar Choke (Mount variation)
Cross Collar Choke (guard variation)
Chokes Applied
Underhook Choke
Bow and Arrow Choke
Arm Triangle Choke
Seal Tightly
Training Mission 2
Chokes Con’t
Perform 5 of ea Choke rotating for 3 minutes. Break 1 min. Repeat 5x:
Underhook Choke
Bow and Arrow Choke
Arm Triangle Choke
Seal Tightly
Guillotine
Baseball Bat Choke
Anaconda
Clock Choke
The Loop Choke
Submission Training - Mission 3
Chokes
Perform 3 Sets of 10:
Guillotine
Anaconda
Baseball Bat
Clock Choke
Loop Choke
Arm Assault - Submissions for the Ground II
Ground Submissions Lexicon
One of the easiest methods to classifying submissions is anatomic association to each joint of the body.
Shoulder Locks
Keylock (Americana)
Hammerlock (Kimura, Omoplata)
Elbow Locks
Arm bar (inverted, mount, violin, folding, flying)
Wrist Locks
Folding
Twisting
Finger Locks
Folding
Shoulder Locks
Omoplata - Hammerlock with Leg
Elbow Locks
Solo Arm Bar Training
The Violin Armbar
Sweeps - Throws on the Ground

Ground Fighting Basics I - Master your Foundation
The Basics
To help you get started - here is your FREE pdf that will help you navigate the art of ground fighting. Click the button to download my Basics of Brazilian Jiu-Jitsu Guide.
Mastering our Foundation
Spider Walks
Spider walks are not only an excellent dynamic warm-up exercise, they build our core, arm and leg strength. These are also a critical element to add to your training for good jiu-jitsu movement down the road for ground maneuvering and agility.
Hip Escapes
Purpose: there isn’t enough ink on the internet to list the practical uses for this movement. If there were only 1 movement you could practice for jiu-jitsu it would be this one, hands down!
Sit Up Guard
Purpose: a pre-cursor to the 'technical get-up’ and a way to pull sweeps and advanced guards as we progress.
Technical Get-Ups
Purpose: critical movement for getting back to our feet when knocked down and the opponent is still standing.
3 Stages of Basic Sweep Training
Sweeps are throws on the ground. Ways to topple our opponent. This drill will prep you for the body mechanics necessary to execute the sweep later down the road when you grapple.
See Saw Training Drill
An excellent exercise to not only build core strength, but flexibility and mobility for grappling an opponent. Due to the neck/shoulder region, some people find this uncomfortable. If this is true for you, refrain from this drill until you seek help from an instructor on proper technique.
Basic Bridging
This video will be included later in your mount escapes training course. However, it is a critical movement for us to begin building into our repertoire now. For mission 1 we’ll be including not only this bridge movement, but a bridge and cross shoulder touch as part of our training.
Mission 1
Foundation Building
This mission is designed to be repeated as many times as you feel necessary.
Warm-Up
Jump Rope for 3 Minutes
20 Torso Twists
20 Toe Touches
20 Squats
Training - complete 3 rounds
Spider Walks - 30x
Hip Escapes - 30x
Over the Shoulder hand touches - 30x - link
Sit-Up Guard - 30x
Sweeps - 30x
See Saw - 20x
Bridge and Roll - 10x
Technical Get-Ups - 10x
Critical Skills
Now that you’ve completed my Mastering your Foundation course you are ready to continue your progress and training with Ground Fighting Basics II - Critical Skills. Take it to the next level!
Ground Fighting Basics II - Critical Skills
Now that we’ve worked on our foundation, it’s time to tackle the critical skills that we’ll need as we venture forth in our ground fighting game.
The Basics
In case you missed in the Mastering your Foundation course, the following guide will help you navigate the art of BJJ as you get started.
The Critical Skills
Forward Hip Escape
Break Down
At times we need to hip escape in the opposite direction in order to escape, or gain a position. This drill helps build the muscle memory for this movement pattern, and preps you for the De La Riva guard sweeps down the road.
Side Hip Escape
A highly useful variation to the hip escape that will be used in a variety of escapes and prevention.
Sit-Thru Breakdown
The sit-thru is going to be used to pass guard in some instances, and in others, we’ll use it to escape from turtle to the bulldozer sweep.
Triangle-Ups
The triangle is one of the deadliest and most effective submissions in jiu-jitsu. This drill prepares us for the technical movements required, and builds our core strength as a bonus.
Hip Break Drill
The hip break is an upper level movement pattern that once learned, becomes an integral part of passing an opponents guard.
Turn to All Four Drill
This is a skill we use at opportune moments where it imperative to turn a bad situation into a good one e.g. - mount escape to dominant position.
Critical Skills Training Mission
Warm-Up
Do a light warm-up before performing the following training mission.
Training - complete 3 rounds
Fwd Hip Escapes - 30x
Side Hip Escapes - 30x (15 each side)
Sit-Thrus - 20x
Triangle Ups - 30x
Hip Breaks - 12x
Turn All Four - 12x
Ground Fighting Basics III - Advanced Basics
Let’s dive into the advanced basics. All of the drills you will find in this course are directly related to technical applications you’ll come to rely on in your ground fighting skillset. Our goal is to build these movements and reactions into your system so they become natural and fast reactions. Good luck!
The Basics
Before we begin…
If you missed Ground Fighting Basics I & II - Master Your Foundation and Critical Skills here is a guide to help you get started. Your FREE pdf that will help you navigate the art of BJJ. Click the button to download my Basics of Brazilian Jiu-Jitsu Guide.
Advanced Basics
Sit-Thru to Bulldozer
Purpose: this movement is used to escape the turtle and drive the opponent to the ground.
Side Control Walks
These drills build upon our core strength and accustom us to transitioning around our opponent without our arms, as they writhe underneath our side control pressure.
Drilling Knee
Also known as ‘knee on belly’. This move is devastating to an opponent when executed properly. Train the pass, to drilling knee in this lesson.
Hammerlock Sit-Up
In addition to the excellent ab workout, this drill goes through the movement patterns necessary for a well timed execution of the hammerlock submission from guard.
Cross Snake
Purpose: this drill focuses on hip shifting and escaping dominant positions, or re-pulling guard.
Scissor Sweep
Building off of our sweep training in mission 1, we’ll now execute the full scissor sweep as part of our basic training.
Spider Guard Thrusters
Unlock the utility of your belt and train your spider guard skills. One of the best open guards in my opinion, and this drill can get you ready to unleash it upon your opponents.
Leg Lasso Training
Again capitalizing on the hidden versatility of our belt, we can use our belt to train the leg lasso, another powerful open guard that works well in conjunction with spider guard.
Advanced Basics Training Mission
Warm-Up
150 Jumping Jacks
20 Lunges
20 Side to Side Squats
20 Trunk Bobs
Training - A.M.R.A.P. - 20*
Sit-Thru to Bulldozer - 20x
Side Control Walks - 20x
Drilling Knee - 20x
Hammerlock Sit-Ups - 20x
Cross Snake - 20x
Scissor Sweeps - 20x
Spider Guard Thrusters - 20x
Leg Lassos - 20x
As Many Rounds As Possible - in 20 Minutes
How to Defeat the BJJ Guard in 4 Easy Steps
Free Code for Members:
0yvprk8
The 4 Steps to Defeat the BJJ Guard
The order of execution in guard passing is instrumental in our success. Skip one of these steps and it usually ends in our demise. The following are the steps, or a sequence, we use in approaching guard passing as a methodical process. Order from chaos:
Base
Break
Control
Pass
Step 1 - Base
The foundation (no pun intended) for any guard passing begins with the base. A solid base is entirely focused on stability and sweep prevention. Without it, we’re doomed. The following points will help us create an effective base to build our guard passing game upon:
Rectangle vs Trapezoid
The overall shape of our body in the base should tell all. A rectangle standing vertical, is far easier to push over than a trapezoid. See the photos for examples.
3 Points of Contact
It is imperative that we maintain 3 or more points of contact the entire time we base, break, and pass. There are exceptions to this rule when we involve advanced guard passing concepts, but for now - 'learn the rule, embody the rule, and then you can break the rule.’
The Sunken Center (cg)
Our bodies Center of Gravity (cg) is located a few centimeters below the navel when standing and kneeling. As we execute basing and breaking, we want to keep our cg as low to the ground as possible.
Block the Sit-Up
Our third point of contact aside from our legs, should be blocking the opponents sit-up. This prevents them from getting up, or choking us as we are in guard.
Arm position for submission prevention
Keep the arms at a good midway point, usually around the opponents solar plexus to prevent the arms from extending too far out where they can execute arm bar submissions on us. Too far back, and we’ll be the victim of a leg triangle submission.
Step 1.2 - Grip Breaking
I have seen people that are extremely successful with breaking grips. In my experience as a smaller grappler/boxer, grip breaking has always been more of a liability than an asset. Especially when inside an opponent's closed guard.
Usually the grip break requires me to lose my ‘3 points of contact’ in order to initiate it. This is very dangerous and compromises our base, which in turn sets us up for a stronger opponent to knock us down.
Additionally, and I found this in stand-up grappling as well, whenever we take our attention away from basing and breaking, we are opening ourselves up for another attack.
If you do choose to fight grips while inside closed guard, then remember this important piece - ‘you break it, you bought it’. This means, if you break a grip, you have to keep control of that arm or it will just grab you again in the same place, or somewhere else.
It’s an interesting game, and far be it from me to dissuade anyone from trying it. If it is of interest, I suggest learning that from someone who is really good at it. Personally, I find it to be the game of defense, and always being one move behind the enemy.
Much of the passing and guard work we’ll deal with here, involves a different strategy - ‘Neutralize the Grips.’ We’ll be moving and using principles that will nullify the grips and holds of our opponent, and at times, use them to our advantage.
Whether we break grips, or not, once we establish a solid base, we need to think about how to break the guard…
Step 2 - Break
Break the Guard
Breaking guard is rife with challenges. Not only do we have a method and sequence to this phase, we have to monitor our posture, base, and technique, all while an opponent is trying to sweep and submit us, or at the least, creating problems for us. This is an extremely dynamic phase of the ground game. To ensure success, we want to work from principles
Basic Methods of Breaking - Gi Variants
Double Belt Push
The first break you’ll learn. Starting with the arms on the chest, walk one hand at a time down to the belt. As soon as the first hand arrives, push the belt toward the opponents head, not their abdomen. Then grip the belt with the second hand and apply continued pressure. Staying low with the cg, walk the knees back one space each, being careful not to overstep. (see posture above).
Diagonal Base Break
Using one hand on the lapel located at the solar plexus (ensure a strong grip here) push on the belt with the other hand. Keep the elbow tight as you move next. Take one knee and shift it to align with the opponent's spine. Pressure back on their legs with your back. You can walk the hand that was on the belt, further down to the hip, or if safe, even the knee. It is important here to have good control. If the opponent controls our grip, we can be triangled here. If the pressure is maintained on the solar plexus, and we stretch back, we are defending that triangle as we break the guard. Failure to keep our grips/position, will lead to our demise.
Basic Methods of Breaking - No-Gi Variants
Sealing Tightly
Pinning the arm across the body and using it as the platform to break. This is the number one go to for a no-gi situation where someone has no belt, or their pants are extremely flimsy, or stretchy, and unable to support the grips required to break.
Double Under
Same break as above, but performed with no-gi by palming pectoral minor and the deltoid muscle. Use of an eagle claw grip on pectoral minor can also increase success here.
Size Matters
Using breaking methods against taller grapplers can be a nuisance. Their legs are longer, making it difficult to stretch the legs far enough to keep pressure. The good news is, there are alternative breaking methods that larger opponents find extremely difficult to close down.
Double Lapel to Bipod
This is a great pass for smaller vs taller where you cannot extend the person’s guard enough to pressure their legs open. Starting from the same base position, grab a same-side lapel in each hand. Punch the lapels up and underneath the opponents underarms as you stand to a bipod position while keeping the head low. Generally it is a good idea to drive the forehead into their solar plexus. Next, bring one leg to the center, in line with their spine. Sit down to the combat position while bringing the knee of the center leg to your chest. This will pry open the guard completely, or enough to be able to get to the combat base where you can then continue to work the full break.
Common Failures in Breaking Guard
Posture is a predominant factor guard breaking. Without proper posture, we will either be swept easily by a larger, stronger foe, or we will fail to apply appropriate pressure at the right geometric angle to break the guard.
Flat Back - this one is common when facing larger opponents as the tendency is for us to solve lack of pressure, by walking our knees back further and further trying to force open the guard. As the knees go further back, our trapezoid disappears, and we’re back to that rectangle we do not want. NOT TO BE CONFUSED WITH LOW HEAD/SHOULDER POSTURE.
Upright - the opposite of the flat back, is sitting up straight. This is a big mistake that can lead to being pushed completely backwards landing under the mount position of our opponent.
The 45 - 45 degree angle of spine posture creates a good angle of attack. This can vary +/- 10 to 15 degrees based on our opponents attack strategy.
No Pop-Tarts - during the breaking phase it is common for us to want to lift our cg in order to move, or push on our opponent. Keeping the center low as we move to break, can prevent sweeps from our opponent, or allow us to regain a strong position in their guard if they are aggressively trying to toss us. The higher our cg in this scenario, the more they will rock us, and the bigger our corrections will be. The larger the correction, the greater window of opportunity for our opponent to gain what they want.
Step 3 - Control
Controlling the Guard
Before we initiate the guard pass, it is imperative to maintain control of the guard. Against an unseasoned ground fighter, without this step we may get lucky and still affect a guard pass, but it is bad practice. Controlling guard is all about proper grips, and/or blocking.
Walking the Ladder
Think of our opponent as a ladder. When we break guard we are essentially climbing down a ladder toward their feet; walking our hands, or control points incrementally as we go. If we skipped a rung of a real ladder, we will likely fall.
In BJJ, we’re already on the ground, but we still experience the metaphorical descent after missing a rung of this imaginary ladder. Without proper controls, this point of the guard break/pass maneuvering is where our opponent is most likely to succeed with a sweep, submission, or at the least, re-pull of guard.
Much of this can be stopped if we know how to control their guard.
Where to grip
Control Points - each of these is relative to the type of pass we’ll discuss in phase 4.
Solar Plexus
Hips
Thighs
Knees
Ankles
As you will see in the following passes, we’re controlling the opponent at one or more of the above locations as we perform each pass.
Step 4 - Pass
Pass the Guard
Basic Ground Passes
There are many guard passes, but the following examples are the passes specifically address some of the more common positions an opponent will take up once their guard is broken.
Knee Slice Pass
Knee Slice Variation w/ Baseball Slide
Double Under Pass
Weave Through Pass
Basic Standing Guard Passes
Double Stuff
Double Toss
Knee to Belly
Wash, Rinse, Repeat
If step 2, or 3 fail, we need to go back to step 1. If step 4 fails, we can at times, simply back up to step 3. If they re-pull guard however, we need to go back to step 1 and work our way down the ladder again.
Passing Advanced Open Guards & Passing
In addition to the basic categorization of ‘closed’ and ‘open’ guard, there are advanced open guards that will require more complex solutions to defeat. These include but are not limited to:
Spider guard
De La Riva guard
Leg lasso
Half-guard
Deep-half
Knee shield
50/50
X-guard
Butterfly guard
Mantis guard
These guards each require specific base, breaks, controls, and passes to neutralize and counter.
See Advanced Guard Breaking & Passing for more on defeating these advanced open guards. Also includes more passes such as - Toreando Pass, Knee on Hip w/ Break, and more.
Here is an example of one guard we’ll address later. The spider guard.
How to Kill the Spider Guard
Escaping Side Control

Side Control - one of the 4 dominant positions in ground fighting. When we’re on the top, this can be an incredibly effective means of controlling and opponent. When we’re on the bottom, it can feel like an inescapable hell that we are trapped in with not way out.
In this course, we’ll learn each of the varying positions of side control, and how they work, so when we learn the escapes, we can recognize the position we’re trapped in, and know which escapes will not work, and which ones will.
Escaping the Mount

The Strikes of Mantis Boxing
Striking is an integral component of our art of mantis boxing. Without it, we cannot function to our optimal levels, and we miss out on critical weapons that could eliminate or disable an opponent before the need for our hooking and grappling skills. This phase of combat is so important we have an entire keyword principle devoted to this single act. We will show this later in this course.
The Kicks of Mantis Boxing

Below, you will find the videos on how to perform each of the kicks, and drills to practice them. Further down, we’re going to use Heel Kick to show drills for various principles you want to get down. It is recommended that you use the same drill, but simply swap out the heel kick for each of the other kicks that apply. Please post your questions in the comments.